Create Security Rules
Securing our EC2 Instance
We need to restrict the access to our EC2 Instance down to just the essentials necessary for our future node to operate properly. We do not want our EC2 instance wide open and vulnerable to malicious actors out on the Internet.
Your instances Firewall rules are called SGs for "security groups". This is similar to software firewall rule sets.
Let's get right to it...
If you are a visual learner, you can access and view a YouTube series dedicated to this process: SSH Key Generation Series - Video 4b by NetMet.
note
If you choose the YouTube Series, it is highly recommended to watch the entire series, from the beginning.
Open Compute EC2 Console
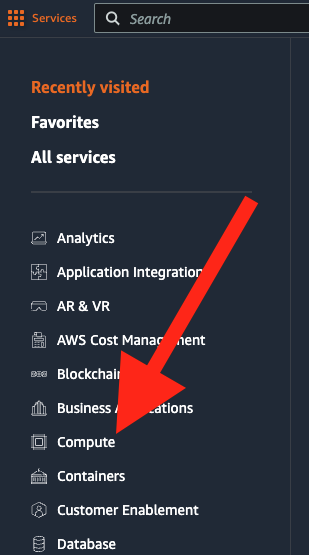
- Click on the
Servicesbutton to start our process.

- From the new drop down box, choose the option
Compute.
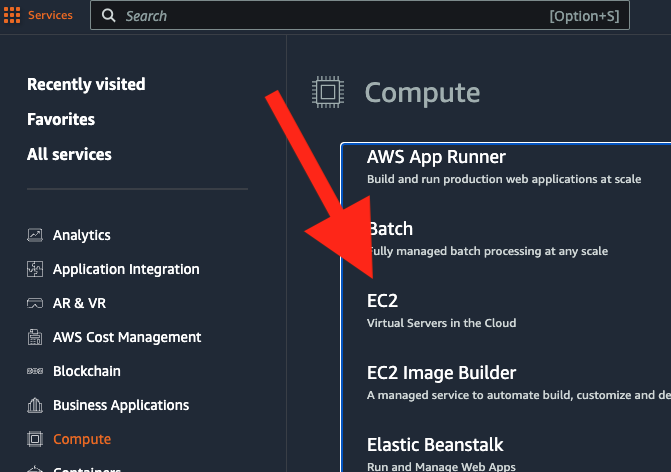
- Choose the option
EC2from the Compute section.
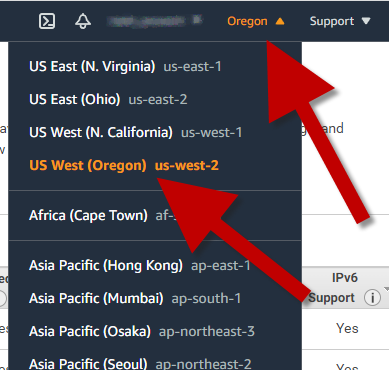
Region
We need to pick a Region to host our EC2 instance.
Access our EC2 details
From the Instance Dashboard, click the link corresponding to your instance id.

This will show all the details of our instance.
Access the Security Group Console
- Select the
Security tab. - Select the link corresponding to the security group that should have been automatically assigned to your instance.
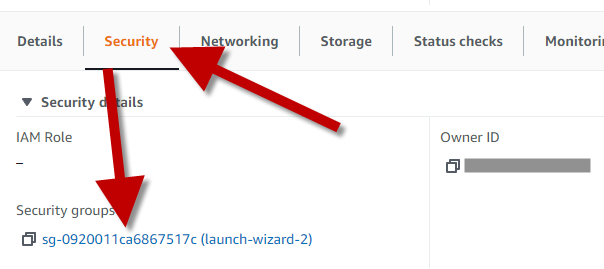
This will take us to our Security Group.
Amazon Web Services OUTBOUND requests
We are going to allow our instance to access all outbound requests. This set up will allow connections that initiate from your EC2 instance outbound. We will not change them.
Advance Concept
If you are a more advanced user, you can alter these rules to your liking. AWS will monitor all inbound requests that are not allowed by associating them with an outbound request. If an incoming TCP or UDP packet attempts to reach your instance without an associated outbound request, it will be automatically denied.
This is what is called "stateful".
Amazon Web Services INBOUND requests
We want to lock down our incoming access. We will only allow the core Constellation Network rules inbound.
- Click on the
Inbound Rulestab. - Click the
Edit Inbound Rulesbutton.

INBOUND RULES
We want to add inbound rules.
The next section can get a little complicated. But, we can get through it!
What you want to do is first, click on www.whatismyip.com and write down your My Public IPv4 IP address.
You will use this IP address as your Source for port 22.
IMPORTANT
This is going to restrict access to your node to your Local Location only. If you want access into your node from other locations (like roaming on your mobile device), you will need to create a more complex rule set here (out of scope of this document).
DANGER
The less restrictive your access, the more vulnerable your node becomes.
Let's add 2 Inbound Rules.
We will leave the SSH as our Type, and then begin to enter in our IP address (obtained from the www.whatismyip.com step 👆).
As you fill it in, the search box should populate and add the /32 for us. Select (click) the option so it populates just below the search box.
Previous Launch Wizard
In the EC2 (Part 1) we had an optional section to associate your local system's IP address.
If this was followed, your SSH connection may already be set correctly

We want to add our second inbound rule.

Constellation SG Rules
For this rule, we will add a port range with a - (dash) in-between the numbers to get 9000-9001.
We will allow Everything to hit this port: 0.0.0.0/0

Our inbound rules will look something like this 👇
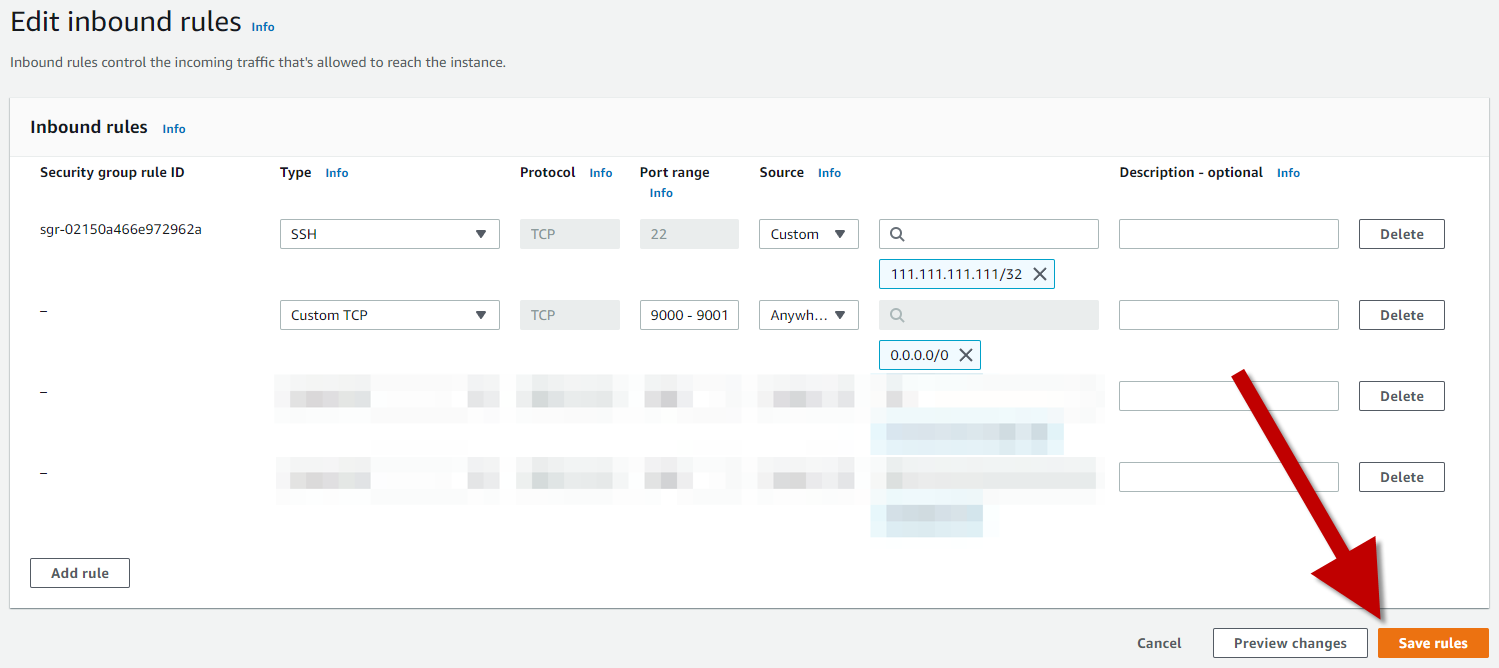
- Click on
Save rules.
REPEAT This process for ports 9010-9011.
MainNet, IntegrationNet or TestNet Launch Requirements
It is highly recommended that you use nodectl to install and control/admin your node.
Please add to your firewall configuration ports 9010-9011 to allow access to your MainNet, IntegrationNet or TestNet validator node's Layer1 connection. To accomplish this, repeat the exact same steps you used to open up ports 9000-9001.
Final Firewall Table
| Type | Protocol | Port Range | Sources |
|---|---|---|---|
| Inbound | TCP | 22 | your local ip address /32 |
| Inbound | TCP | 9000-9001 | All IPv4 IPv6 |
| Inbound | TCP | 9010-9011 | All IPv4 IPv6 |
| Type | Protocol | Port Range | Sources |
|---|---|---|---|
| Outbound | ICMP | All IPv4 IPv6 | |
| Outbound | All TCP | All Ports | All IPv4 IPv6 |
| Outbound | All UDP | All Ports | All IPv4 IPv6 |
WAY TO GO! You are done.
We can now move on to access our node!